ODK Collect and ODK Aggregate to Store and Manage Your Data
More and more organizations are using mobile devices to collect data in the field. Open Data Kit (ODK) is a open-source suite of tools that allows data collection using Android mobile devices and data submission to an online server, even without an Internet connection or mobile carrier service at the time of data collection. Streamline the data collection process with ODK Collect by replacing traditional paper forms with electronic forms that allow text, numeric data, GPS, photo, video, barcodes, and audio uploads to an online server.
Created by developers at the University of Washington's Computer Science and Engineering department and members of Change, ODK is an open-source project available to all. To learn more about ODK, view recent updates, more tutorials, and to contribute to the project, visit getodk.org and learn more from our tutorials.
When using ODK Collect, you have several options for where to send the data you’ve collected in the field:
-
ODK Aggregate, allowing you to host survey forms and responses on a your own cloud-based server.
-
Google Drive and Google Sheets, allowing ODK Collect to access survey forms in your Google Drive account and send data collected on an Android device directly to Google Sheets.
The Google Drive and Google Sheets option makes setting up a mobile data collection effort simple. Upload your ODK forms to Google Drive and ODK Collect will find them. Then, collect data on your mobile device offline in the field. When you’re back online, send it to Google Sheets. If your form includes photos, they will be stored unlisted on your Google Photos Album Archive and linked to from Google Sheets. This is a simple, user-friendly way to manage and store your ODK data without having to set up a server like ODK Aggregate.
If you need a simpler, less technical option for your project, review our ODK Collect and Google Drive tutorial.
Tutorial Contents
-
Prerequisites
-
Create Your Form for Data Collection & Submissions
-
Set up your instance of ODK Aggregate
-
Deploy your form
-
Install & Configure ODK Collect
-
Collect Data Using ODK Collect
-
View Your Data
-
View Your Data in Google Earth
-
Discussion and Feedback
-
What's Next
Prerequisites
-
You’ll need a Google Account (or create a new Google Account)
-
You need an Android mobile device running Android OS of 1.6 or newer.
Create Your Form for Data Collection & Submissions
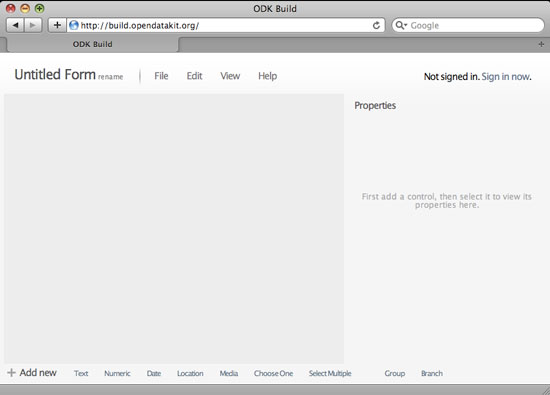
There are several ways you can create forms for ODK. You can use ODK Build (a drag-and-drop form designer) or design your form in a spreadsheet using XLSForm. Most ODK users design their forms in Excel but if you're creating a form for the first time, ODK Build may be the simplest way to start. We cover the ODK Build method below but if you’re interested in other methods you can learn more in the ODK Docs.
-
Go to ODK Build at http://build.opendatakit.org/
-
Create a new account or log in with an existing account. Note that this account is different from your Google Account, and you can choose to use a different login and password. Your forms will be saved to this account for future reference.
-
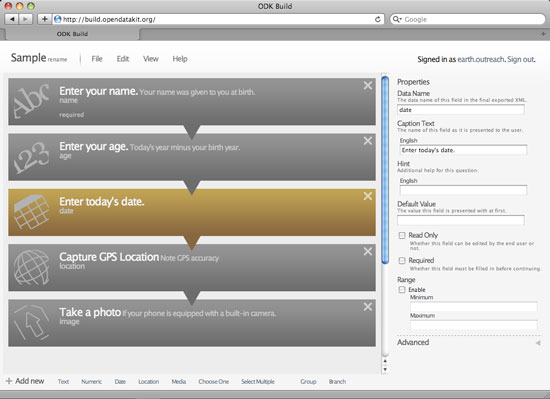
Add questions to your form by clicking on the type of question you'd like to add (eg. location, text, etc.) at the bottom of the page.
Each question has several common properties as well as unique properties. For an explanation of the Common Properties, see below. You do not need to save each question as you go, but remember to save the form when you're satisfied with it.
-
Enter a Text question, such as "What is your name?", in the Caption Text section.
Fill in the properties of the text field question on the right-hand side. Optional: you can enter a minimum and/or maximum character length for the text field.
-
Enter a Numeric field to allow users to record a number in their form, such as "What is your age?" in the Caption Text section.
In the properties section, specify whether you'd like to record the number as an Integer (whole number) or Decimal (0.0)
-
Allow the form users to specify a Date. The phone will automatically record the current date, and allow the user to enter the date or modify the date in your form.
-
If the users of your form have a mobile device that is equipped with a GPS chipset, you can add a Location entry into your form. The question will prompt the user to record the GPS location. The user will be able to view an estimate of the phone's built-in GPS accuracy while the phone's GPS acquires satellite positions.
-
Allow users of your form to attach media files to their form submissions. You can select from Image, Audio or Video as media format. The form will switch to the device's camera mode, voice memo mode or video camera mode, and the media will be stored with that form entry. For this example, enter "Take a photo" in the Caption Text section and select "Image" as the Kind of media you will use from the drop-down menu. Hint: if you know you're going to have a slow internet connection when you want to upload your form submissions, and you wish to have photos inside your forms, some devices allow you to reduce the default image size so the filesize is smaller when you want to send your completed data over the internet.
-
Use the "Choose One" question type if you'd like the user to select one option from several options. You can specify which options you present by clicking "Add Option." Make sure you add an underlying value to your Options; this is required for each Option. Use lower case text and underscores ( _ ) instead of spaces.
-
Use the "Choose Multiple" question type for multiple choice questions. As with Choose One, make sure to add an underlying value to each Option and use lower case and underscores for the underlying value fields.
Common Properties in Form Questions
Data name (required): This is the variable name that is stored in the xml of your form. You must use lower case and underscores ( _ ) instead of spaces.
Caption Text (required): Enter your question as you'd like it presented to the user.
Hint: Specify a question's hint or help text. Note: If you are localizing your form, you must enter English text here as well as localized text. If you do not want to enter English default text, you must create the forms as xml in a text editor. See the tip at the end of this tutorial for more information about localizing forms.
Default value: this is the default information that will be presented to the user. For example, if you are gathering information on a group of children and you know the majority of the childrens' age is 12, you can enter "12" as a default value.
Read-only: If you don't want the user to be able to enter information for this question, check this box.
Required: Users will not be able to save a form as completed unless they have entered information for questions that are checked "required."
-
Once you're satisfied with your form, save it to your ODK Build account. Go to File > Save Form As. Next time you log in to your account, you can select File > Open to open the form.
-
To download the form to your computer, select File > Export as XML. You will see xml code. Click the "Download" button to save the file to your computer as an .xml file. This is the format that you will import onto your mobile device in the next step.
More information about ODK Build is available on the ODK website.
Set up your instance of ODK Aggregate
Now you will need to set up your own instance of ODK Aggregate, where you will be able to host your survey forms to be downloaded by your data collectors to their Android devices. ODK Aggregate will also be used to store, manage, visualize, publish and export your collected survey data.
ODK Aggregate is an open source Java application which can be hosted on cloud providers such as Google Cloud. You can learn more about your cloud provider options and review detailed instructions on how to install ODK Aggregate in the ODK Docs.
Deploy your form
Once you’ve set up your ODK Aggregate instance, you can upload forms -- the last step before you start collecting data out in the field with your forms! Once you've uploaded a form, anyone with a Google Account who knows the domain name of your AppEngine instance can view your form, its submissions and download your form to their mobile device to upload submissions to your form. (You can set access preferences in your AppEngine settings)
-
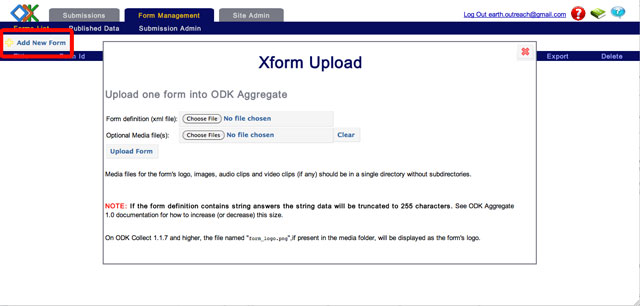
Click “Form Management” tab at the top of the page.
-
Click “+Add New Form” button.
-
You will be able to select the form to upload from your computer. Choose the .xml form you wish to upload to your ODK Aggregate instance. If your form has media files associated with it, for example, images inside the form's questions, you can also upload media files that your form references in the XML here.
-
Click “Upload.” If your XML form is in the correct format, it will be uploaded and you'll see it appear on the “List of Forms” page.
Install & Configure ODK Collect
-
Go to the Google Play Store and search for ODK Collect. If you already have ODK Collect installed, update it so you have the newest version.
-
Open the ODK Collect app
-
Click on the Menu (three dots in the upper right corner)
-
Click on General Settings
-
Click on Server
-
Under Server Settings, click on Type so you can change the destination path for where your ODK Collect data will be sent.
-
Select "ODK Aggregate"
-
Next, click on URL and type in the URL of your ODK Aggregate server.
-
Hit the back button to return to the main menu.
Collect Data Using ODK Collect
-
Click "Get Blank Form."
-
Search for the form you just addedby entering the form name in the search box. Click the check box on the right side and hit "Download Selected." You’ll see a window appear saying "Success" once the form completes downloading. Download your sample form that you just created.
-
In the main menu of ODK Collect, click "Fill Blank Form" and proceed to fill out your information. When complete, hit "Send Finalized Form" and your submission will be sent to your ODK Aggregate instance.
View Your Data
-
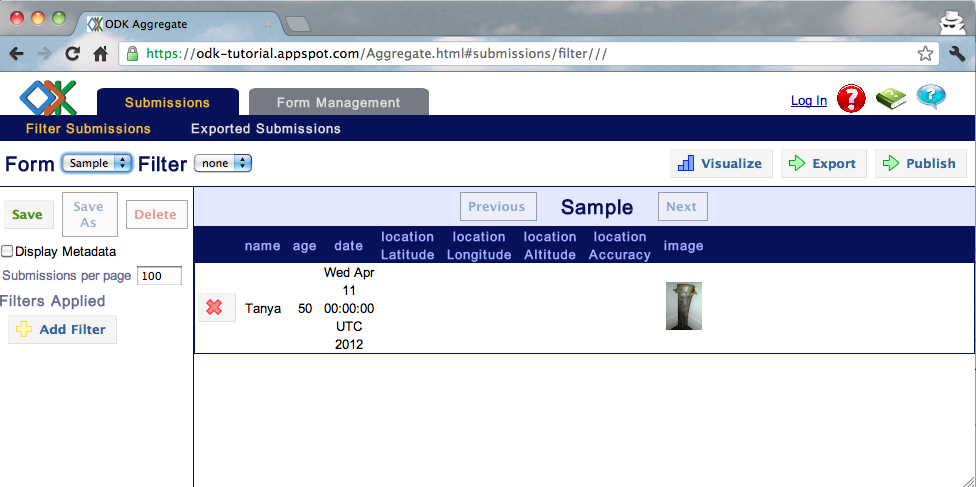
In your ODK Aggregate instance, click on the Submissions tab and select the form “Sample” from the drop-down menu, or the name of the form whose submissions you wish to view. Click on the “View Submissions” button next to the “Sample” form.
-
You'll see all submissions, created by yourself and others, who have sent completed submissions to your ODK Aggregate instance. Submissions with photos have a link on the far right of the row to view each individual photo submission.
View Your Data in Google Earth
You can also view your data in Google Earth.
-
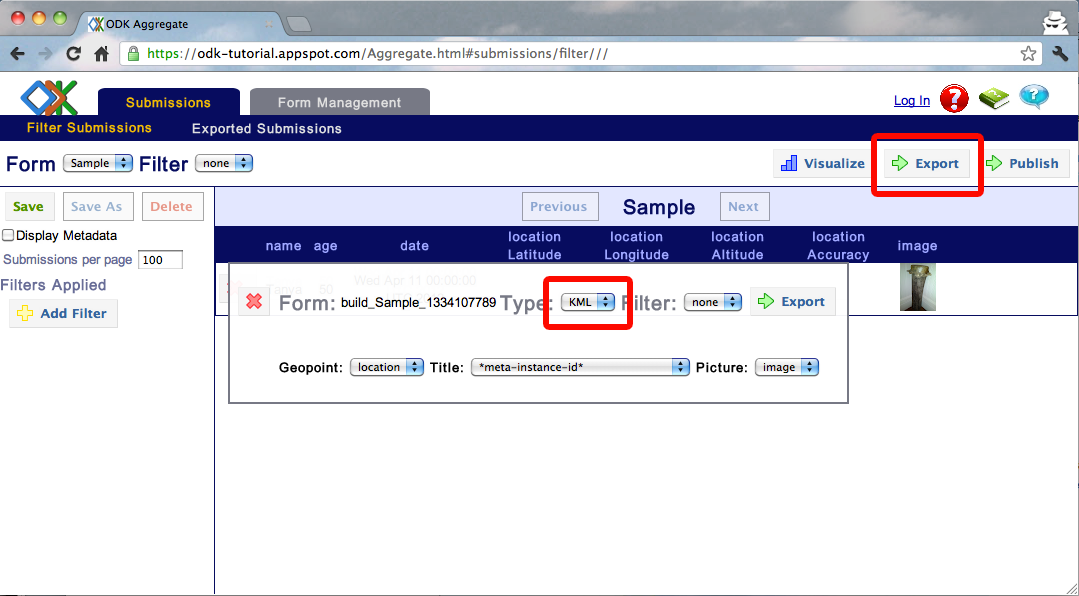
On the “List of Forms” page of your ODK Aggregate instance, click “Create KML file.”
-
Several options will appear. For “Field to Map,” select the field which corresponds to your form's GPS location question. For “Title Field,” select the field that you would like to appear at the top of your Google Earth pop-up balloons. For “Picture Field to Display,” select the field which corresponds to your photo. Then click “Submit,” and your Google Earth KML file will begin downloading.
-
Once the file has finished downloading, double-click the file to open it in Google Earth. You should see placemarks for each data submission. If you click on a placemark to open the pop-up balloon, you should see a table with the data values for that submission.
If you are using the Sample.xml form, here is how your pop-up balloons will appear:

Tip: Once you have imported your data into Google Earth, you can add additional points, lines and polygons to tell a story about your field data collection results. Learn how to Annotate Google Earth.
If there is historical imagery available for the region you are working in, you can see the changes over time. Learn more about historical imagery in Google Earth.
You can also use Google Earth to create a narrated tour to tell the story about the region you are collecting data about, the purpose and goals of your data collection, and the conditions in the field. Learn more about creating narrated tours in Google Earth.
Discussion and Feedback
Have questions about this tutorial? Want to give us some feedback? Visit the Google Earth Help Community to discuss it with others.


